在这里一并介绍SpringBoot的基本布局和项目开始
这里插入Spring-Security官方网址
1. SpringBoot (IDEA)快速开始
Ⅰ:引入 pom.xml 文件,在IDEA中可以直接导入web,security,mysql,mybatis等各种需要的模块
Ⅱ:等待创建完成,然后建立各层次
Ⅲ:在java包下,创建以下目录:config , controller , dao , domain(entity) , security , util ,service
这些类大概包括了基本项目的构造,有利于降低耦合度
controller: 表现层,与web页面和html交互,可以使用 addAttribute 把变量放到前端界面,然后通过EL表达式在前端页面取值,进行操作
config: 配置层,一些基本的配置,这里也可以用applications.yml/application.properites 来配置,因为对于SpringBoot,“约定大于配置” ,我们一般通过约定来规划配置,在这里我使用了java文件进行配置,更为麻烦,一般config定义配置类
dao: 数据库交互层,dao层中的方法一般定义为接口,让service实现,这里定义的是mapper的方法,即是数据库基本操作语句,这里可以使用mybatis-plus使用逆向工程生成dao和mapper
domain: 别名entity , 也就是实体类,这里的定义一般与数据库的键值相同,这样会避免冲突的发生
serivce: 这里有两种方法,我一般倾向于创建一个service接口与dao的代码完全相同,然后创建serviceimpl类来实现service接口,降低程序耦合性
util: 工具类,看业务逻辑需要什么便可以自己定义,在这个项目定义了MD5密码加密
2. 使用mybatis连接数据库
在appication.properties中
ms.db.driverClassName=com.mysql.cj.jdbc.Driver
ms.db.url=jdbc:mysql://localhost:3306/cache?characterEncoding=utf-8&useSSL=false&serverTimezone=Asia/Shanghai
ms.db.username=root
ms.db.password=123456
ms.db.maxActive=500

logging.level.org.springframework.security= INFO
spring.thymeleaf.cache=false
spring.main.allow-bean-definition-overriding=true
这里有一个需要注意的地方,ms.db.url需要设置一个serverTimezone,如果不这么做在springboot启动时会报错
这里是Mybatis基本设置
ComboPooledDataSource dataSource = new ComboPooledDataSource();
dataSource.setDriverClass(env.getProperty("ms.db.driverClassName"));
dataSource.setJdbcUrl(env.getProperty("ms.db.url"));
dataSource.setUser(env.getProperty("ms.db.username"));
dataSource.setPassword(env.getProperty("ms.db.password"));
dataSource.setMaxPoolSize(20);
dataSource.setMinPoolSize(5);
dataSource.setInitialPoolSize(10);
dataSource.setMaxIdleTime(300);
dataSource.setAcquireIncrement(5);
dataSource.setIdleConnectionTestPeriod(60);
3. SpringSecurity基本配置·
重写2个configure方法,一个定义身份权限,一个定义拦截器,拦截各种请求和静态资源等等
@Configuration
@EnableWebSecurity
public class WebSecurityConfig extends WebSecurityConfigurerAdapter {

    @Bean
    UserDetailsService customUserService(){ //注册UserDetailsService 的bean
        return new CustomUserService();
    }
    @Override
    protected void configure(AuthenticationManagerBuilder auth) throws Exception {
        auth.userDetailsService(customUserService()).passwordEncoder(new PasswordEncoder(){

            @Override
            public String encode(CharSequence rawPassword) {
                return MD5Util.encode((String)rawPassword);
            }

            @Override
            public boolean matches(CharSequence rawPassword, String encodedPassword) {
                return encodedPassword.equals(MD5Util.encode((String)rawPassword));
            }}); //user Details Service验证
    }
    @Override protected void configure(HttpSecurity http) throws Exception {
        http.authorizeRequests()
                .antMatchers("/css/**").permitAll()
                .anyRequest().authenticated()
                .and()
                .formLogin()
                .loginPage("/login")
                .failureUrl("/login?error")
                .permitAll()
                .and()
                .logout()
                .permitAll();
    }
}
这里是 service 层,实现UserDetailSercvice(SpringSecurity接口) ,添加用户权限
@Service
public class CustomUserService implements UserDetailsService { //自定义UserDetailsService 接口

    @Autowired
    UserDao userDao;

    @Override
    public UserDetails loadUserByUsername(String username) { //重写loadUserByUsername 方法获得 userdetails 类型用户

        SysUser user = userDao.findByUserName(username);
        if(user == null){
            throw new UsernameNotFoundException("用户名不存在");
        }
        //System.out.println(user.getPassword());
        //System.out.println("用户名为"+user.getUsername());
        List<SimpleGrantedAuthority> authorities = new ArrayList<>();
        //用于添加用户的权限。只要把用户权限添加到authorities 就万事大吉。
        for(SysRole role:user.getRoles())
        {
            System.out.println(role.getId());
            authorities.add(new SimpleGrantedAuthority(role.getName()));
            System.out.println(role.getName());
        }
        return new org.springframework.security.core.userdetails.User(user.getUsername(),
                user.getPassword(), authorities);

    }
}
4. util工具类(md5)
MD5加密工具,将数据库密码进行加密,首先执行这个类得到加密后的password,然后使用sql语句将对应的账户密码插入数据库中,在这里,用户名与密码相同
public class MD5Util {
private static final String SALT = "tamboo";
public static String encode(String password) {
password = password + SALT;
MessageDigest md5 = null;
try {
md5 = MessageDigest.getInstance("MD5");
} catch (Exception e) {
throw new RuntimeException(e);
}
char[] charArray = password.toCharArray();
byte[] byteArray = new byte[charArray.length];
for (int i = 0; i < charArray.length; i++)
byteArray[i] = (byte) charArray[i];
byte[] md5Bytes = md5.digest(byteArray);
StringBuffer hexValue = new StringBuffer();
for (int i = 0; i < md5Bytes.length; i++) {
int val = ((int) md5Bytes[i]) & 0xff;
if (val < 16) {
hexValue.append("0");
}
hexValue.append(Integer.toHexString(val));
}
return hexValue.toString();
}
public static void main(String[] args) {
System.out.println(MD5Util.encode("abel"));
}
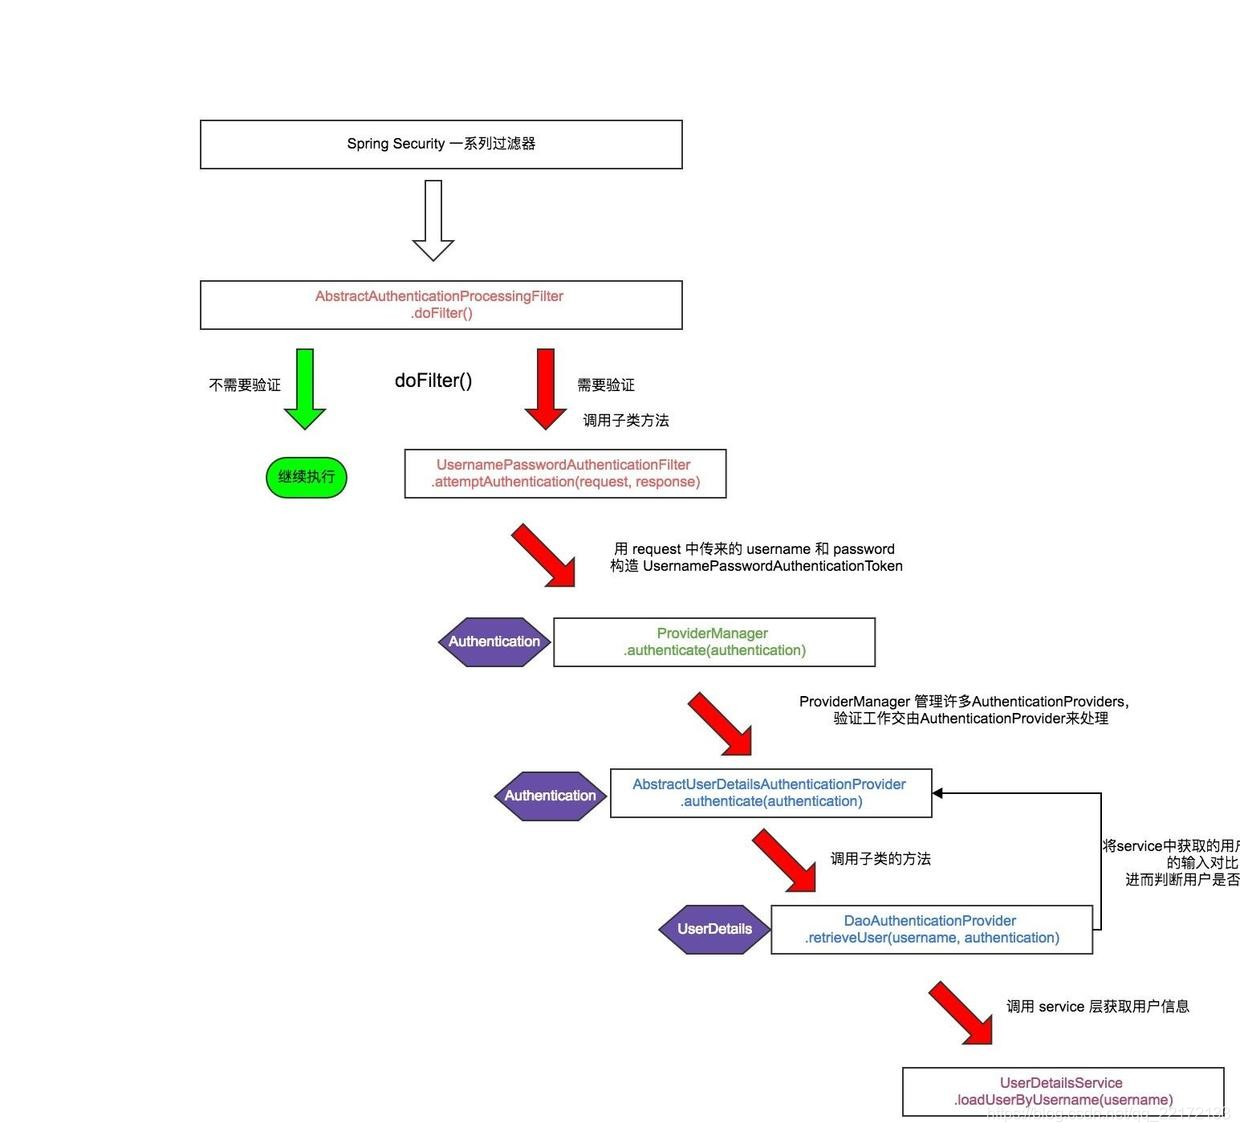
}SpringSecurity知识点解读
Ⅰ: 整体流程表:引用自博客地址
Ⅱ:注解分析
1.注解@EnableWebSecurity
在Springboot应用中使用Spring Security,官方提示该注解应该和@Configuration一起使用,注解WebSecurityConfige类
此类继承WebSecurityConfigurerAdapter,这样就构成了Spring Security的配置类
2.抽象类 WebSecurityConfigurerAdapter
在一般情况下,我们会让标注了 @Configuration和 @EnableWebSecurity *类继承抽象类 *WebSecurityConfigurerAdapter
这样的话只需要重写抽象类中的方法即可完成配置
方法configure(AuthenticationManagerBuilder auth)和 configure(HttpSecurity http)
第一个配置的是权限,第二个配置的是url的拦截

5.踩坑
调试过程:
在SpringBoot启动类中,在Spring Boot2.x版本中@SpringBootApplication已经包含了@ComponentScan,无需再进行配置
在controller层中,如果加@RestController,那么在方法中return “login” 并不会跳转到login.html页面,因为@RestController方法是@ResponseBody 和 @Controller方法的合成,
直接用@Controller方法,return “login”,这样就会跳转到login.html页面
本博客所有文章除特别声明外,均采用 CC BY-SA 4.0 协议 ,转载请注明出处!